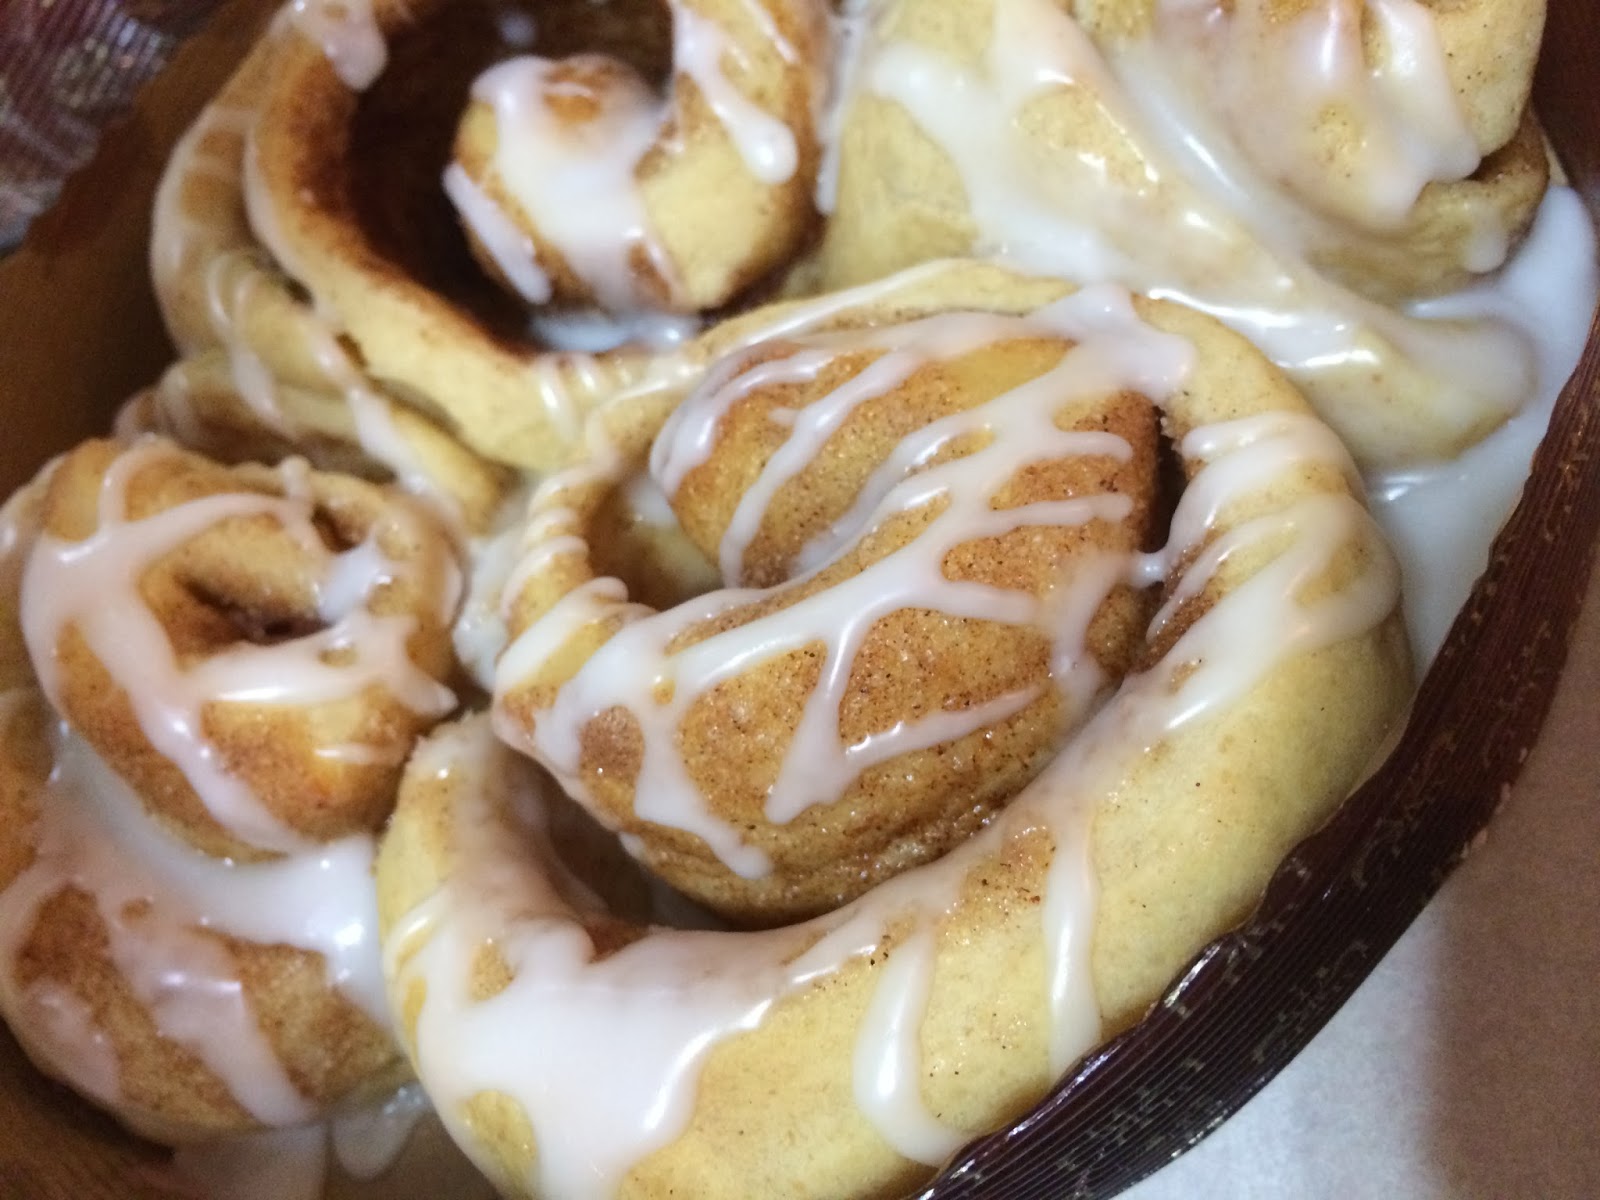
Pinterest 1 hour cinnamon rolls
Adapted from http://thismomsmayhem.com/pinterest-1-hour-cinnamon-rolls/ and http://valleyridgerecipes.blogspot.com/2010/04/cinnamon-rolls_17.html
Ingredients:
14 tablespoons warm water (I used about 110-115 degree water)
2 1/2 tablespoons sugar
2 tablespoons vegetable oil
4 1/2 teaspoons SAF Yeast
3/4 teaspoon salt
1 egg
2 1/2 cups plus 2 tablespoons of flour (You may need to add in a few more tablespoons of flour while kneading the dough if it appears too sticky.)
1/4 cup butter, melted (I used a non-dairy spread here to make the cinnamon rolls dairy-free)
1/2 cup sugar (I've used white sugar and brown sugar before. Brown sugar gives you a bit more caramel-like flavor.)
2 1/2 teaspoons cinnamon
*optional could add in some chopped cinnamon chips, nuts, or raisins if desired
Icing:
2-3 cups powdered sugar
1 teaspoon vanilla
2-3 tablespoons milk (I used a non-dairy vanilla flavored coffee creamer here.)
Directions:
Preheat oven to 400 degrees. In a large bowl, mix the sugar and yeast together. Next add warm (110-115 degree) water and oil. Mix it together just for a few seconds, until the yeast is incorporated. Let it sit for 15 minutes, you will notice the yeast mixture will start to get activated and foamy. During this process, I just set my bowl on top of the oven to absorb some of the extra heat that the oven was giving off. After 15 minutes rest, add in the salt, egg, and flour. Mix it all together and knead the dough for about 10 minutes. If the dough feels too sticky or wet (basically too hard to handle while kneading), add in a few teaspoons of extra flour. After kneading for 10 minutes, let the dough stand for 10 minutes. Again, I just let it sit on top of my stove while I was preparing my filling. For the cinnamon filling, mix sugar and cinnamon in a small bowl and melt butter in a separate bowl. Next, put a little bit of oil on a silicon mat or parchment paper and roll/pat out the dough into a rectangle. My dough fit into about a large cookie sheet so it was easy to contain the mess while rolling it out. Pour and brush the melted butter on the dough. Sprinkle the cinnamon/sugar mixture out evenly. Then roll up the cinnamon roll to make a long "snake" as my kids would call it. :) Cut into even pieces, about an inch or so wide, you should get roughly about 12 rolls. Place rolls on a baking sheet, lined with parchment paper. Let the rolls rise one last time for another 10-15 minutes. Then bake for about 10 minutes or so, until lightly brown. Let the rolls cool. Prepare icing by mixing the powdered sugar with the vanilla and milk. Whisk together until it is smooth and you have reached the desired consistency for the icing. If it appears too thin, add in more powdered sugar, if it looks too thick, add in a bit more water or milk. Once rolls are cool enough to touch, drizzle with icing.
Extra Yummy Notes:
I have only used two different yeast brands, both were SAF yeast, basically an active dry instant yeast. This SAF yeast you can buy online from like King Arthur Flour product line or I bought mine at a kitchen specialty store. OR some that I got at a local grocery store was the Red Star SAF Gourmet Perfect Rise Yeast. Please comment or share if you have luck or no luck with other brands of yeast, as I love to get that information to help others.
Water temperature is also important I think, as most yeast packets will say what the best temperature is for activating it. With this recipe, I don't exactly know what "warm water" met with the original recipe, so I put my digital meat thermometer into the water and checked the temperature before I mixed it into the yeast, I went with about 110-115 degree water for my yeast. The other thing is to make sure you mix the dough for the whole 10 minutes. Seriously, I got a good workout practically when I've made these rolls by hand. I like to get my hands on the dough though, I think it is therapeutic for me as I do enjoy it. :) So I kneaded the dough by hand for 10 minutes. Two of the times, I used a hand mixer with a dough hook, but I had some issues with the dough sticking to the hook a bit, so I then just used a wooden spoon to finish the rest and kneaded it by hand. I really don't think it gets as incorporated and activated as well when using a hand mixer, unless you have a heavy duty mixer. Which the one time I used my big KitchenAid it ended up working pretty good. The times I used a mixer, my dough appeared to be a little more wet or shaggy-looking, which made it a little harder to cut the cinnamon rolls towards the end.
One other thing I did with this recipe, was I modified the original down to make about one pan of 12 rolls and not a few dozen. Also, I made it a few times dairy-free, using butter and milk alternatives, which is super easy! Earth Balance Spread and their Sweet Cinnamon "butter" spread worked great as a substitute for butter here. Also, I used a dairy-free creamer in the frosting instead of milk to accommodate.
 |
| Captured a few cinnamon roll making steps along the way. |
 |
| Rolls - 1- before first rise -- 2 - after rise before going into oven and -- 3 - size when baked |
 |
| Holiday Cinnamon Roll Wreath |
 |
| The 2 different brands of yeast I've used in the past yielding good results. |

No comments:
Post a Comment